這問題困擾我一兩年了。
我有一臺Win10的筆電,但它的觸控板時常無反應,有時候心情好開機後就有指標,有時候沒有指標;有時候休眠後重啟就有指標;有時候莫名奇妙就有指標。driver也重裝過,能否使用根本是碰運氣。但我又不想為了這事重灌,畢竟系統設定重來很麻煩。
不知道哪看來的
連按
Fn6 + Fn9 + Fn12 + Fn5
就可以出現滑鼠指標了!傑克這真是太神奇了!
神奇的影片底佳
https://www.youtube.com/watch?v=l0qhOGofV_c
2020年3月26日 星期四
2019年7月23日 星期二
WebsStorm display NPM tab
The Tab [NPM] was gone, where can we show/display it?
It is easy. Right click on package.json, then choose [Show npm Scripts]

It is easy. Right click on package.json, then choose [Show npm Scripts]

2019年6月18日 星期二
Synology NAS 開機執行特定 Script 於 rc.d 資料夾下
想在 Synology NAS 開機時執行特定 Script
1. 將寫好的 script 放在 /usr/local/etc/rc.d/ 之,檔案名稱一定要有 .sh 為結尾(ex. your_script.sh)
2. 變更權限 sudo chomd 755 your_script.sh
3. script 內容必須包含 start 和 stop 等參數,範例如下
在系統開機時也會自動執行 ./your_script.sh start
可參考官方文件 [Run Scripts When the System Boots]
https://originhelp.synology.com/developer-guide/integrate_dsm/run_with_system_boot.html
1. 將寫好的 script 放在 /usr/local/etc/rc.d/ 之,檔案名稱一定要有 .sh 為結尾(ex. your_script.sh)
2. 變更權限 sudo chomd 755 your_script.sh
3. script 內容必須包含 start 和 stop 等參數,範例如下
#!/bin/sh
#
# Put this file in /usr/local/etc/rc.d/your_script.sh

case "$1" in
stop)
 echo "[Stop]"
 # do something here"
 ;;
start)
 echo "[Start]"
 sudo "/volume1/matt/your_script.sh"
 ;;
restart)
 echo "[Restart]"
 $0 stop
 sleep 1
 $0 start
 ;;
status)
 ps | grep laravel_queue_listen | grep -v grep
 ;;
*)
 echo "usage: $0 { start | stop | restart | status}" >&2
        exit 1
        ;;
esac
之後你可以透過手動 ./your_script.sh start|stop|restart 來操作。
在系統開機時也會自動執行 ./your_script.sh start
可參考官方文件 [Run Scripts When the System Boots]
https://originhelp.synology.com/developer-guide/integrate_dsm/run_with_system_boot.html
2019年5月29日 星期三
安裝 npm forever 會遇到的小問題
安裝 forever
npm install forever -g
接著 forever start your_node_code.js
就可以在背景一直執行(不會因為terminal 關閉而結束)
但是有可能會遇到 forever: command not found 的問題
這時候的解決方法就是想辦法找到你的 forever 被安裝在哪裡,然後用 ln 的方式導到你的 /usr/bin/ 下使用
以我的例子
先用 npm get prefix 找到npm 的位置
/volume1/@appstore/Node.js_v8/usr/local
然後發現forever package其實被安裝在
/volume1/@appstore/Node.js_v8/usr/local/lib/node_modules/forever/bin/forever
於是我們將它link起來以便隨地使用
sudo ln -s /volume1/\@appstore/Node.js_v8/usr/local/lib/node_modules/forever/bin/forever /usr/bin/forever
收工
後記。
發現有可能把 $PATH 加入即可
export PATH=$PATH:/volume1/@appstore/Node.js_v8/usr/local/bin
2019年5月25日 星期六
Using Linux Crontab example
If you want to execute some task in every 5 minutes?
如果想在 Linux 中定時執行某些任務?
Example situations: Sync up system time every 5 minutes.
Create a file /root/synctime.sh and set 775, the synctime.sh execute your update logic then which execute every 5 mins
Here is a online crontab exerciser (這裡有個線上 crontab 的練習器)
https://crontab.guru/every-weekday
如果想在 Linux 中定時執行某些任務?
crontab -l    // see the list of crontab
crontab -e    // edit current crontab
Example situations: Sync up system time every 5 minutes.
Create a file /root/synctime.sh and set 775, the synctime.sh execute your update logic then which execute every 5 mins
*/5 * * * * /root/synctime.sh
Here is a online crontab exerciser (這裡有個線上 crontab 的練習器)
https://crontab.guru/every-weekday
2019年5月6日 星期一
[Git] 在 TortoiseGit 裡記憶專案密碼
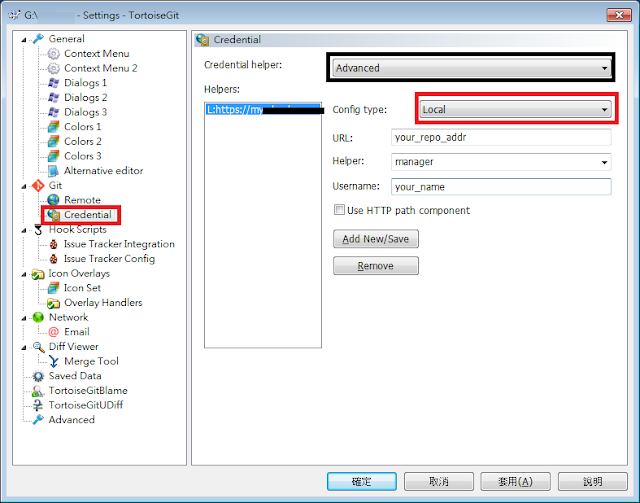
也許你也覺得每次 pull/push 程式碼就要重新輸入一次密碼好煩?來,以下教你如何用 TortoiseGit 記憶專案密碼。
1。首先,右鍵點選專案裡的 [Settings]

1。首先,右鍵點選專案裡的 [Settings]

2。移到 Credential 頁面,Config Type 選擇 Local,然後填入你 Repository 的 URL,Helper是指認真的工具,在此選 manager,將會以微軟內建對話框詢問。(若忘記專案網址,可用指令查詢: git config --get remote.origin.url

就這麼簡單。
2018年10月18日 星期四
Deploy A React App Website With React-Router To Synology WebStation By Nginx (部署含有 React-Router 的網站到 Synology WebStation,以 Nginx為例)
When we deploy a simple ReactJS website to Synology WebStation, the easy way is put the built files into default web folder.
Assuming the site URL is http://www.example.com/
However, there is a problem when we want to access http://www.example.com/category1/ will bring 404 or 403 error.
Because React-Router is a SPA(single-page-application) project, all URL switch need start from index.html.
To fix this issue, I do a experiment with Nginx Server.
My Synology NAS model is DS415+, before the experiment, it need to prepared following:
1. Install Node.js
2. Enable SSH function on NAS
Step.1 is easy, just like this:

Add this slice in file:
It means we try to redirect any other URI to index.html, that will make React-Router work!
Save it and reload Nginx.
Now your website should work perfect with React-Router.
But .......
The Synology Nginx always reset this config to default after reboot. We need to add a routine task to check if file changed.
Step.6 Create a routine task
First, make a copy of certainly file server.webstation-vhost.conf to other position you like, in my case, I copy it to /volume1/web/server.webstation-vhost.conf
Start to create a task.

Then check files diff every minute or 5 minutes, it up to you.

The script code:

Remember to run task after create

Reference:
[1] https://www.jianshu.com/p/51ba2bec00c7
[2] https://tklab.club/synology-dsm-nginx-wordpress
[3] https://blog.oldghost.net:888/synology-reverse-proxy-usage.html
#SynologyNAS
#WebStation
#VirtualHost
#ReactJS
#ReactRouter
Assuming the site URL is http://www.example.com/
However, there is a problem when we want to access http://www.example.com/category1/ will bring 404 or 403 error.
Because React-Router is a SPA(single-page-application) project, all URL switch need start from index.html.
To fix this issue, I do a experiment with Nginx Server.
My Synology NAS model is DS415+, before the experiment, it need to prepared following:
1. Install Node.js
2. Enable SSH function on NAS
Step.1 is easy, just like this:
 |
| Install Node.js via Synology Package Center |
Step.2 Enable SSH port in firewall rules.
 |
| Enable SSH port |
Step.3 Create a virtual Host in Web Station

Step.4 Create a Virtual Host
 |
| Setting to Virtual Host |
Notice the "Document root" means the root of your web folder.
Step.5 Login NAS via SSH
Okay, let's log in NAS via your terminal, in here I manipulate with Cygwin console.
ssh -p {your_ssh_port} {your_account_name}@{your_NAS_ip}
Then edit file /etc/nginx/app.d/server.webstation-vhost.conf with root
root@NAS:/volume1/web/code/build# vi /etc/nginx/app.d/server.webstation-vhost.conf
Add this slice in file:
location / {
        root /volume1/web/code/build;
        index index.html;
        try_files $uri /index.html;
}
It means we try to redirect any other URI to index.html, that will make React-Router work!
Save it and reload Nginx.
root@NAS:/volume1/web/code/build# nginx -s reload
But .......
The Synology Nginx always reset this config to default after reboot. We need to add a routine task to check if file changed.
Step.6 Create a routine task
First, make a copy of certainly file server.webstation-vhost.conf to other position you like, in my case, I copy it to /volume1/web/server.webstation-vhost.conf
Start to create a task.

Then check files diff every minute or 5 minutes, it up to you.

The script code:
syn_conf=/etc/nginx/app.d/server.webstation-vhost.conf
ok_conf=/volume1/web/server.webstation-vhost.conf
syn_filesize=`ls -l $syn_conf | awk '{ print $5 }'`
ok_filesize=`ls -l $ok_conf | awk '{ print $5 }'`
if [ $syn_filesize -ne $ok_filesize ];  then cp $ok_conf $syn_conf; sudo nginx -s reload; fi

Remember to run task after create
Reference:
[1] https://www.jianshu.com/p/51ba2bec00c7
[2] https://tklab.club/synology-dsm-nginx-wordpress
[3] https://blog.oldghost.net:888/synology-reverse-proxy-usage.html
#SynologyNAS
#WebStation
#VirtualHost
#ReactJS
#ReactRouter
訂閱:
文章 (Atom)