安裝 forever
npm install forever -g
接著 forever start your_node_code.js
就可以在背景一直執行(不會因為terminal 關閉而結束)
但是有可能會遇到 forever: command not found 的問題
這時候的解決方法就是想辦法找到你的 forever 被安裝在哪裡,然後用 ln 的方式導到你的 /usr/bin/ 下使用
以我的例子
先用 npm get prefix 找到npm 的位置
/volume1/@appstore/Node.js_v8/usr/local
然後發現forever package其實被安裝在
/volume1/@appstore/Node.js_v8/usr/local/lib/node_modules/forever/bin/forever
於是我們將它link起來以便隨地使用
sudo ln -s /volume1/\@appstore/Node.js_v8/usr/local/lib/node_modules/forever/bin/forever /usr/bin/forever
收工
後記。
發現有可能把 $PATH 加入即可
export PATH=$PATH:/volume1/@appstore/Node.js_v8/usr/local/bin
2019年5月29日 星期三
2019年5月25日 星期六
Using Linux Crontab example
If you want to execute some task in every 5 minutes?
如果想在 Linux 中定時執行某些任務?
Example situations: Sync up system time every 5 minutes.
Create a file /root/synctime.sh and set 775, the synctime.sh execute your update logic then which execute every 5 mins
Here is a online crontab exerciser (這裡有個線上 crontab 的練習器)
https://crontab.guru/every-weekday
如果想在 Linux 中定時執行某些任務?
crontab -l    // see the list of crontab
crontab -e    // edit current crontab
Example situations: Sync up system time every 5 minutes.
Create a file /root/synctime.sh and set 775, the synctime.sh execute your update logic then which execute every 5 mins
*/5 * * * * /root/synctime.sh
Here is a online crontab exerciser (這裡有個線上 crontab 的練習器)
https://crontab.guru/every-weekday
2019年5月6日 星期一
[Git] 在 TortoiseGit 裡記憶專案密碼
也許你也覺得每次 pull/push 程式碼就要重新輸入一次密碼好煩?來,以下教你如何用 TortoiseGit 記憶專案密碼。
1。首先,右鍵點選專案裡的 [Settings]

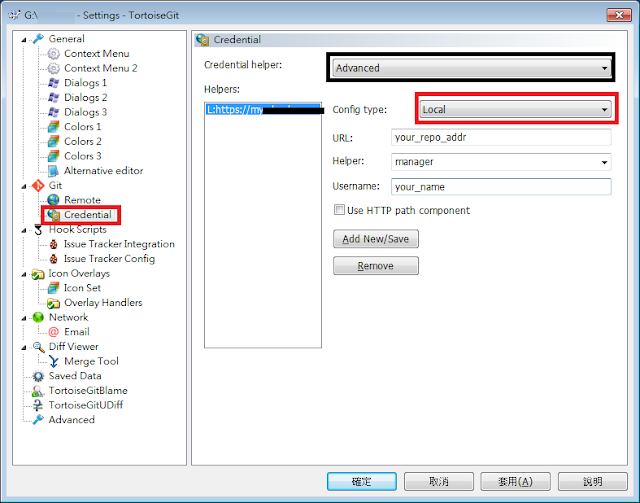
1。首先,右鍵點選專案裡的 [Settings]

2。移到 Credential 頁面,Config Type 選擇 Local,然後填入你 Repository 的 URL,Helper是指認真的工具,在此選 manager,將會以微軟內建對話框詢問。(若忘記專案網址,可用指令查詢: git config --get remote.origin.url

就這麼簡單。
2018年10月18日 星期四
Deploy A React App Website With React-Router To Synology WebStation By Nginx (部署含有 React-Router 的網站到 Synology WebStation,以 Nginx為例)
When we deploy a simple ReactJS website to Synology WebStation, the easy way is put the built files into default web folder.
Assuming the site URL is http://www.example.com/
However, there is a problem when we want to access http://www.example.com/category1/ will bring 404 or 403 error.
Because React-Router is a SPA(single-page-application) project, all URL switch need start from index.html.
To fix this issue, I do a experiment with Nginx Server.
My Synology NAS model is DS415+, before the experiment, it need to prepared following:
1. Install Node.js
2. Enable SSH function on NAS
Step.1 is easy, just like this:

Add this slice in file:
It means we try to redirect any other URI to index.html, that will make React-Router work!
Save it and reload Nginx.
Now your website should work perfect with React-Router.
But .......
The Synology Nginx always reset this config to default after reboot. We need to add a routine task to check if file changed.
Step.6 Create a routine task
First, make a copy of certainly file server.webstation-vhost.conf to other position you like, in my case, I copy it to /volume1/web/server.webstation-vhost.conf
Start to create a task.

Then check files diff every minute or 5 minutes, it up to you.

The script code:

Remember to run task after create

Reference:
[1] https://www.jianshu.com/p/51ba2bec00c7
[2] https://tklab.club/synology-dsm-nginx-wordpress
[3] https://blog.oldghost.net:888/synology-reverse-proxy-usage.html
#SynologyNAS
#WebStation
#VirtualHost
#ReactJS
#ReactRouter
Assuming the site URL is http://www.example.com/
However, there is a problem when we want to access http://www.example.com/category1/ will bring 404 or 403 error.
Because React-Router is a SPA(single-page-application) project, all URL switch need start from index.html.
To fix this issue, I do a experiment with Nginx Server.
My Synology NAS model is DS415+, before the experiment, it need to prepared following:
1. Install Node.js
2. Enable SSH function on NAS
Step.1 is easy, just like this:
 |
| Install Node.js via Synology Package Center |
Step.2 Enable SSH port in firewall rules.
 |
| Enable SSH port |
Step.3 Create a virtual Host in Web Station

Step.4 Create a Virtual Host
 |
| Setting to Virtual Host |
Notice the "Document root" means the root of your web folder.
Step.5 Login NAS via SSH
Okay, let's log in NAS via your terminal, in here I manipulate with Cygwin console.
ssh -p {your_ssh_port} {your_account_name}@{your_NAS_ip}
Then edit file /etc/nginx/app.d/server.webstation-vhost.conf with root
root@NAS:/volume1/web/code/build# vi /etc/nginx/app.d/server.webstation-vhost.conf
Add this slice in file:
location / {
        root /volume1/web/code/build;
        index index.html;
        try_files $uri /index.html;
}
It means we try to redirect any other URI to index.html, that will make React-Router work!
Save it and reload Nginx.
root@NAS:/volume1/web/code/build# nginx -s reload
But .......
The Synology Nginx always reset this config to default after reboot. We need to add a routine task to check if file changed.
Step.6 Create a routine task
First, make a copy of certainly file server.webstation-vhost.conf to other position you like, in my case, I copy it to /volume1/web/server.webstation-vhost.conf
Start to create a task.

Then check files diff every minute or 5 minutes, it up to you.

The script code:
syn_conf=/etc/nginx/app.d/server.webstation-vhost.conf
ok_conf=/volume1/web/server.webstation-vhost.conf
syn_filesize=`ls -l $syn_conf | awk '{ print $5 }'`
ok_filesize=`ls -l $ok_conf | awk '{ print $5 }'`
if [ $syn_filesize -ne $ok_filesize ];  then cp $ok_conf $syn_conf; sudo nginx -s reload; fi

Remember to run task after create
Reference:
[1] https://www.jianshu.com/p/51ba2bec00c7
[2] https://tklab.club/synology-dsm-nginx-wordpress
[3] https://blog.oldghost.net:888/synology-reverse-proxy-usage.html
#SynologyNAS
#WebStation
#VirtualHost
#ReactJS
#ReactRouter
2018年10月1日 星期一
React refs example
class Parent extends React.Component {
   callChildFunction = () => {
       this.child.handleActionParent();  ///calling a child function here
  }
   render(){
      return (
           <div>
           {/* other things */}
           <Child ref={(cd) => this.child = cd}/>
           </div>
      )
    }
}

class Child extends React.Component {
   handleActionParent = () => {
       console.log('called from parent')
   }
   render() {
      return (
           {/*...*/}
      )
   }
}2018年9月28日 星期五
[JavaScript] Convert Byte to other size, Byte轉換
  bytesConvertToSize = (bytes) => {
    let sizes = ['Bytes', 'KB', 'MB', 'GB', 'TB'];
    if (bytes === 0)
        return '0 Bytes';

    let i = Math.floor(Math.log(bytes) / Math.log(1024));
    return +(Math.round(bytes / Math.pow(1024, i) + "e+2") + "e-2") + ' ' + sizes[i];

    // 下行會有尾數為 0 的狀況,因此改另一方法
    // With problem 123.499 will be 123.50 KB,
    // return (bytes / Math.pow(1024, i)).toFixed(2) + ' ' + sizes[i];

  }
2018年1月23日 星期二

2017年12月7日 星期四
保哥教你如何讓 windows command 變好看 (How to have good looking Windows Command Prompt)
保哥教你如何讓 windows command 變好看


[保哥部落格連結]
https://blog.miniasp.com/post/2017/12/06/Microsoft-YaHei-Mono-Chinese-Font-for-Command-Prompt-and-WSL.aspx
https://blog.miniasp.com/post/2017/12/06/Microsoft-YaHei-Mono-Chinese-Font-for-Command-Prompt-and-WSL.aspx
[臉書連結,下面有討論]
https://www.facebook.com/will.fans/posts/1908557939173341
[保哥 Github]
https://github.com/doggy8088/MicrosoftYaHeiMono-CP950
直接下載
Win7 使用方法
1. 下載字型後安裝
2. 修改 HKEY_LOCAL_MACHINE\SOFTWARE\Wow6432Node\Microsoft\Windows NT\CurrentVersion\Console\TrueTypeFont
新增 REG_SZ, "950xxx" = "Microsoft YaHei Mono"
(xxx 為任意字元, 第一個 x 不能為數字)
ps. 我自己是用 950a11

3. 在 cmd 視窗上選擇預設值

4. 選擇 Microsoft YaHei Mono

就大功告成啦!十分感謝 Will 保哥的教學,在此膜拜他一下。
2017年11月6日 星期一
MircoSD Card General Recommendations 使用與保存方法
General Recommendations
1. There are counterfeit memory cards out there. Buying from a reputable retailer helps minimize the risk of getting a fake.
(市面上充斥許多偽卡,請向可靠的商家購買記憶卡以降低買到偽卡風險。)
2. Memory cards are complicated electronic products. A small percentage of electronic products end up being faulty from the manufacturing process. So it’s good practice to test your card before using it in a mission critical application. Better yet, have spare/s as backup.
(記憶卡為複雜的電子產品,有小部份的機率的產品會在製造過程損壞。因此建議在使用記憶卡前要先進行完整的測試;而更好的做法是勤勞地為它備份。)
3. Memory cards are not designed for long-term archival storage of photos and video. It’s good practice to download the data as soon as practical and get it backed up securely.
(記憶卡並非設計為長期備份的儲存載體,尤其是存儲照片和影片。較好的做法是在每次用完後儘快取出重要檔案並保持良好的備份習慣。)
4. Format the card in the camera rather than with your computer. It reduces the risk of formatting problems.
(請儘量使用相機或手機裝置進行格式化,而非先在電腦上進行,如此一來可降低格式化問題的風險。)
[1] Refs: Have Camera Will Travel: MicroSD Card Speed Tests
2017年6月20日 星期二
讓記事本預設是 UTF-8
相信會找到這篇文章來的朋友一定是有這方面的困擾,一般來說,微軟內建的記事本的預設編碼是 ANSI,然而當我們需要存成 UTF-8 時,還要特地另存新檔(Save as)才能轉換,萬一忘記會造成一些無法預期的錯誤,不如就直接將記事本設成 UTF-8 吧!
首先隨便新增一個文字檔,可看到原本的格式是 ANSI
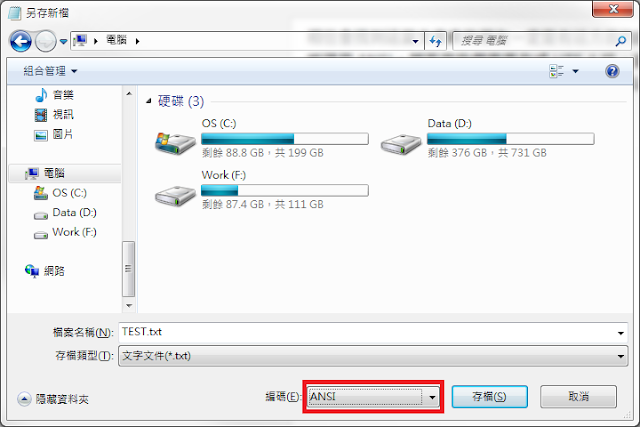


首先隨便新增一個文字檔,可看到原本的格式是 ANSI

我們在桌面上建一個檔案,將檔案命名為 TXTUTF-8.txt,並且不要輸入任何東西。在存檔時將檔案編碼選擇 UTF-8,接著將這個檔案放到 C:\WINDOWS\SHELLNEW 路徑下。

完成後打開 regedit ,移到 HKEY_CLASSES_ROOT\.txt\ShellNew 下,創建一個字串值並命名為 FileName,接著給予字串值為 TXTUTF-8.txt

將所有記事本關掉後,之後新增的純文字檔預設都變成 UTF-8 囉!
訂閱:
文章 (Atom)